Kim Kardashian is probably single handedly responsible for the “contour craze” happening in the world of makeup. You can find her famous photo prepped after contouring with a simple Google search.
You’ve got to admit that that’s some clever makeup sorcery. And as bandwagons go…
With all this talk of contouring magic got me interested, and I’ve recently tried integrating it in my make up routine. But before you attempt contouring, you need to understand the reason for doing it anyway. One site sums it up:
Contour, also called shading, has gained a lot of attention over the past year or so, but it’s actually a trick that makeup artists have been using forever. Using two different hues of strategically applied, thoroughly blended face makeup, you can define your bone structure. (Contour will make your nose appear smaller, cheekbones more pronounced, jaw more angular, forehead smaller, and eyes bigger.) With practice, you can change the shape of your face with makeup.
Well that’s all I needed to know to try contouring. Anything that can make my eight head look like a forehead is worth a try in my book.
Basic Principles
You’ll be using two shades of color–one a few shades lighter than you, and one a few shades darker. Contouring mimics the basic rule of lighting: dark shades work to recede while lighter shades come into prominence. And with the goal of all makeup techniques, the aim to create the appearance of symmetry.
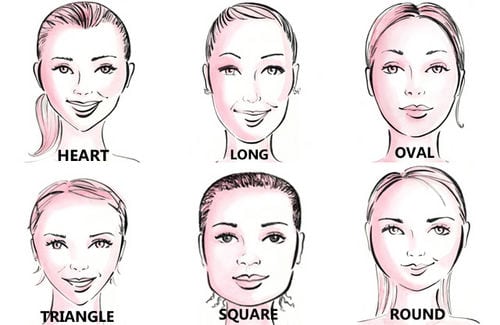
To determine which technique you use, you first need to know what face shape you have–oval, heart-shaped, long, oval, square, triangle, round and square. Mine is oval/heart.
Here’s my first attempt a applying the highlighter in the areas on my face I want to bring forward. I’ll follow this up with applying the darker shades along the base of my cheekbones, along my hairline, and along the upper side of my nose. I used a cream concealer so that you could better see the distinction. I’m filling the dark spots with a deep brown from a contour kit from Anastasia Beverly Hills.
Obviously there’s going to be a lot of blending going on, so you’ll need a few tools…
Makeup sponge: This need to be slightly damp.
Fan brush: You’ll be using this for the application of your contour powder.
Foundation brush with a pointed tip: Use this for the precision application of the powder along your nose.
 A contour kit you like. I just purchased the Anatasia Beverly Hills contour kit in DEEP.
Blending is a bit hard to explain, so I’ve included a tutorial video to demonstrate:
Click here for instruction on other face shapes and click the tab on the left for the instructional video that applies to you.
So here’s the big reveal of my first real attempt at contouring…
Now…will this be an everyday thing for me? Nooooo….but I’ll definitely integrate the technique when I make myself up for videos and stuff. But it seems a little over the top for everyday.
So…what do you guys think?